
Introduction
In a real battlefield, camouflage is very important to improve the survivability of soldiers and their military equipment. Also in our wargames/hobby we may want to add special terrain features, effects or battlefield credibility by adding several camouflage elements.
One way to do this is painting vehicles and equipment in a such a way that it blends with the environment in which it is making its activities (and not waiting for the nature to do its things...). Another thing is to make camouflaged structures or elements that could be used to camouflage/hide soldiers and equipment.
This tutorial is about camouflaged structures, especially those hastily done for soldiers, land vehicles and aircrafts. Using band aid roll for making camouflage net is not something new. I have found out from other hobbyists who employ it for 28mm miniatures. What is quite new is using it for 6mm (of course, somewhere on the internet there should be an example for this already).
What do you need?
* a part from a band aid roll cut in a 30 cm length
* a paper clip
* toothpicks
* brown, white, yellow, green, grey, black red and other similar variants of these color paints
* a plastic sheet on which you should work and one to use and cut
* cutter and scissors
* white glue
* green stuff or similar
* putty
* (optional) superglue
* (optional) comercially or home made grass, plants, tree branches and the like
** some money (or good friends), patience and time.
*** (optional) an incentive to do it, like planning a new wargame scenario or campaign for the weekend or do all of these better than me (this is actually easy...)
Procedures
1. Gather all the needed stuff (yes, yes, patience too, expect mistakes to happen, continue please).
2. With a scissors, cut a part from a band aid roll in a length of 30 cm (easy to work with and enough for a first batch, if you do not need too much camouflage net). The scissors work well than a cutter because it does not ruin the fabrics of the band aid.
3. On a plastic sheet put some water and some white glue.
4. Mix until you have a good substance, diluted glue.

5. Put the part of band aid on this diluted glue in order to have it all wet. Do this with care so that it does not glue with parts of itself - so try to keep it in a length as before. Leave it a day to dry.
6. With an almost destroyed brush (not a new one so you will not ruin it in the "machinge gun" process) apply small points/pots, or diagonal irregular shapes of paints to create a camouflage (use as many paints as needed). Try to cover as much as you can.


7. With a scissors cut parts from this painted band aid. Try to cut parts in a rectangle or whatever shapes you need. As in all these steps, modify lengths and the sort in such a way that they suit your projects. You can measure or use common sense. It does not have to be something exact. It will work for hastily done camouflage net structures.

8. You now should have many camo nets available. Careful place them on a pile.
9. Cut toothpicks with the cutter in a length of your choosing (could be like this: cut a toothpick in three parts and no worries about measuring lengths, just use your common sense to have approx. similar lengths of them). Put a cutter on a toothpick, roll the toothpick with the cutter gentle on it. It will do a mark on the toothpick and then you can easily break with fingers.
7. Cut rectangle shapes from a plastic sheet to make bases for the structures. Length 3 cm, width 2 cm, for example.
8. Prepare putty (with a color paint - white, yellow, brown - mixed with the putty for different types of camouflage structures - winter, desert, summer) and apply to these cut pieces in order to make proper bases. Leave it a day to dry.
9. Prepare green stuff, make small blobs from it. Place a small amount of white glue on parts of the cut toothpicks, then place a green stuff blob and apply to the base with putty. Apply superglue also if you feel it is necessary. Leave it a day to dry.
10. Apply the cut pieces from the band aid roll (camouflaged nets) on the poles made from parts of toothpicks. Glue with white glue, small blobs on each beam should be sufficiently. Also the band aid has many holes and this comes in handy when sticking to the poles (beams). Leave it some hours to dry. Before applying nets you can bend all their sides so that the net looks better. Instead of poles you can use green stuff to create a structure like sandbags/trench works or a combination and then apply camo net. For hangar use a paper clip to make the structure. Bend a little and use the same method like for toothpicks when you glue it to the base (for it, you really need green stuff). Of course, the camo net should be made from a larger part of band aid roll and the base should be resized accordingly.


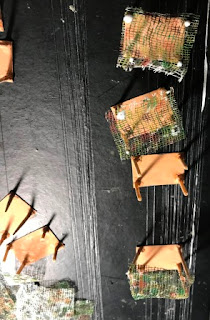
11. Apply additional camo elements (grass, branches etc.) with super glue to the top of camouflaged net. Not much (camo elements or glue) because it will warp the net. Leave it a day to dry.
12. You can keep parts of camouflaged nets not used in order to apply them directly on vehicles or buildings.
Conclusions
There you have it. Camouflaged Net and Camouflaged Structures, hastily done (well, in some days, but in a matter of hours in the real battlefield). With more work and care, things could look even better.
Winter Camouflaged Net Structure
Summer Camouflaged Net Structure
Desert Camouflaged Net Structure
Hope it was explained clear and you like the results. Questions, opinions, examples? Post them in the comments section. Love to read them and to learn some new ways of doing it. It helps everybody in the hobby community.
No comments:
Post a Comment